Add WordPress Custom Post Meta Fields
Overview
Adding custom post meta fields to your posts, pages, custom post types, products, etc. is EXTREMELY helpful. This allows you to add any missing data that is beneficial to your custom use case.
While I have this in the "plugins" category, the same functionality can be added to a theme. The reason this recipe is in the plugins category is it's primarily functional. However, if you don't need a plugin, add this to your theme.
This recipe contains 3 different methods that all cooperate. I'd recommend grouping these methods in a way that they are easily maintainable. If you are using a theme check out Prevent a Large functions.php By Grouping Functionality. In a plugin, I'd recommend a similar structure of creating some sort of included/required functionality, whether it's an object or just a file that contains these methods.
We will go through the process of adding this functionality and displaying the additional post meta in the meta box.
Step 1: Add Method to Register Custom Meta Box
The first step we need to take is register the custom meta box to display our custom meta field. Add the following to an included PHP file:
add_action("add_meta_boxes", "ssu_add_post_meta_box");
function ssu_add_post_meta_box()
{
    add_meta_box("ssu-custom-meta-fields", "SSU Custom Meta Fields", "ssu_post_box_markup", "post", "normal", "high", null);
}
The parameters we will focus on are as follows:
ssu-custom-meta-fieldsThe unique identifier/id of the custom meta field.SSU Custom Meta FieldsThis is the title of the meta box.ssu_post_box_markupThis is the name of the function that will render our form and the guts of the meta box (we work with this next).postWe are only displaying this field on the post editor page. Set topageor whatever the slug is for your custom post type if you are adding fields there.
Step 2: Add Method to Display Form Inputs
Preferably in the same included PHP file, add the next function to display the form:
function ssu_post_box_markup( $post )
{
    wp_nonce_field( basename(__FILE__), "ssu-post-additional-fields-nonce" );
    include( get_template_directory().'/inc/custom-post-meta-field/markup.php' );
}
This accepts a single parameter which is the $post the form appears on. We will be using this in our display of the form to pre-populate the meta field if it already contains a value.
First, we add a nonce field for security. That will injected into our form. Next, we include our form mark up. You don't have to do that, you can render it all within the function if you want. I like having the view separated if we want to add more meta fields otherwise your function will get hairy.
The markup file that contains the form looks like this:
<?php
    $extraField = get_post_meta( $post->ID, 'ssu-extra-field', true );
?>
<div>
    <div>
        <label for="ssu-extra-field">SSU Extra Field</label><br>
        <input name="ssu-extra-field" type="text" value="<?php echo $extraField; ?>"/>
    </div>
</div>
We are just adding an input to the meta box which will contain the value of our custom field (if it's set). The nonce field will be injected before this into our form. This input can be any form field that you want (checkbox, radio buttons, text, number, etc.). If you are using an HTML editor, you will have to initialize it appropriately, but it is possible.
Step 3: Save Custom Meta Value
Finally, we need to persist the value to the database when the user fills out the information. In the file you added the other methods, add this code:
add_action("save_post", "ssu_save_post_custom_meta_fields", 10, 3);
function ssu_save_post_custom_meta_fields( $postID, $post, $update )
{
    if ( !isset($_POST["ssu-post-additional-fields-nonce"] )
        || !wp_verify_nonce( $_POST["ssu-post-additional-fields-nonce"], basename(__FILE__) ) ){
            return $postID;
    }

    if( !current_user_can( "edit_post", $postID ) ){
        return $postID;
    }

    if( defined("DOING_AUTOSAVE") && DOING_AUTOSAVE ){
        return $postID;
    }

    $ssuExtraField = '';
    if( isset( $_POST['ssu-extra-field'] ) ){
        $ssuExtraField = $_POST['ssu-extra-field'];
    }
    update_post_meta( $postID, 'ssu-extra-field', $ssuExtraField );
}
We hook into the action save_post and run the method to save our additional meta. We run 3 checks before we actually persist the data.
- We make sure the
nonceis valid. This is for security reasons and ensures that the request came from our site. - We make sure the user has the right permissions to edit the post.
- We make sure that we aren't autosaving the post. We don't want this data to persist on an auto save.
If these checks pass, we initialize the $ssuExtraField, grab it from the $_POST request if it exists, and run the update_post_meta to save the data to the specific post, with the name of ssu-extra-field and the value of what was passed in.
Step 4: Retrieve Custom Meta Value
We saw a sneak peak of this in Step 2 when we filled in the existing post meta data. To grab the custom meta field from anywhere (plugin or theme), run the following method:
$extraField = get_post_meta( $post->ID, 'ssu-extra-field', true );
Debugging
This can be a little finicky. The first thing you should check is all of your callbacks. Make sure they are named correctly to register the post meta box, the fields are registered correctly, and the form field is displaying.
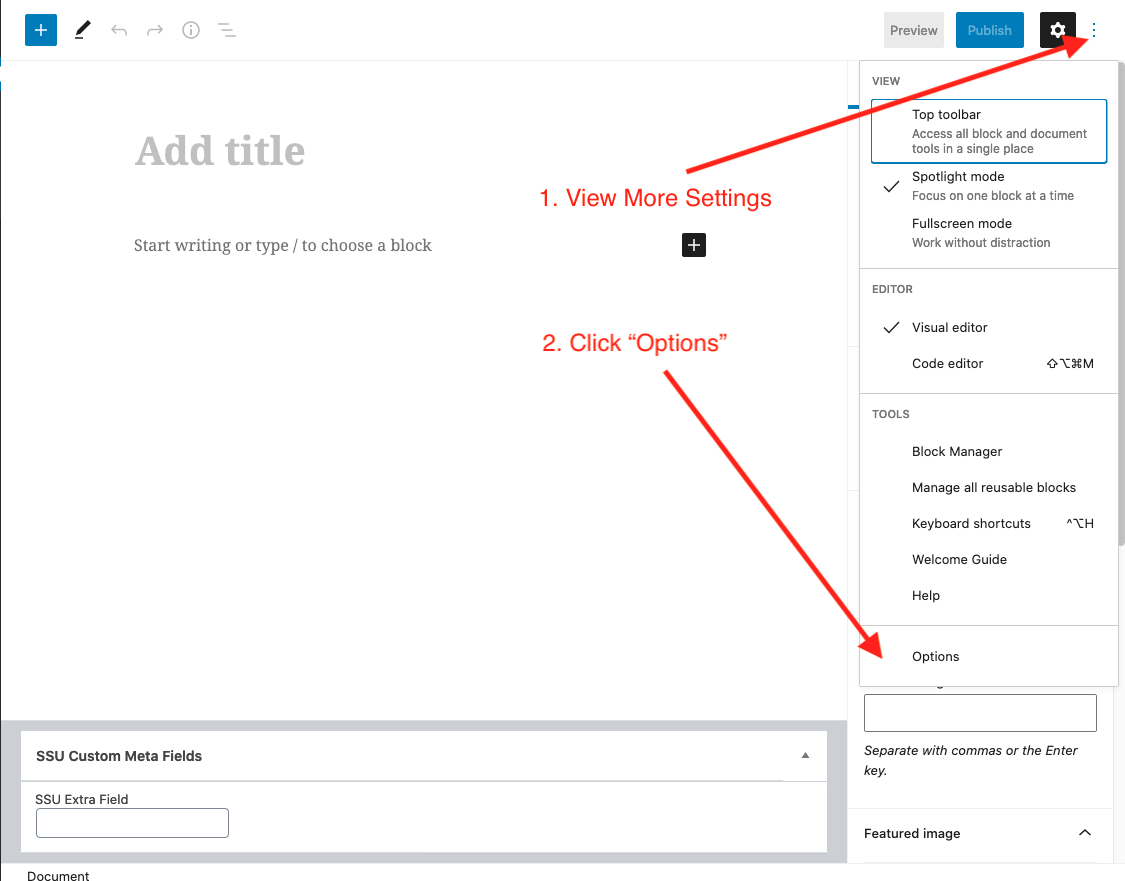
Second, ensure you are allowing the form field to be displayed in the editor.
To do this, ensure your panel is being displayed by first clicking the more options button and clicking Options:
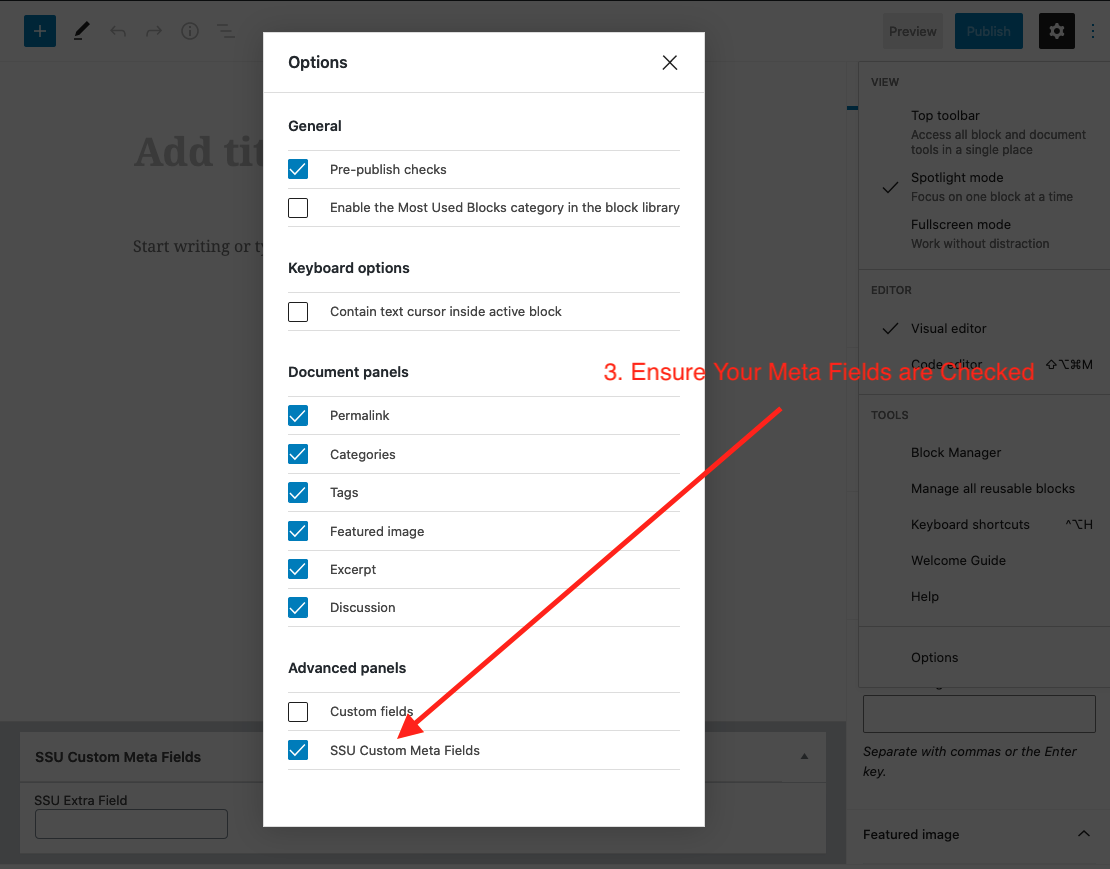
Scroll to the bottom of the modal and ensure your meta box is checked:
Usage Ideas
- Subtitles on pages
- Toggle featured image display
- Additional product data for WooCommerce